

Introduction
Speech enhancement allows you to improve the quality of audio captured from the microphone—reducing noise, removing artifacts, and enhancing clarity before sending it to ASR, saving it to file, or forwarding it elsewhere.
This makes it especially useful when you want to improve speech recognition accuracy.
You can configure your Speech Enhancer using either VDK-Studio. There’s no single configuration that fits all use cases, but you can start with one of the available templates and choose the one that best matches your needs.
The Speech Enhancer is a Modifier — in a pipeline, it sits between the Producer (e.g., microphone) and the Consumer. To learn more about Pipeline check Get Started guide.
Audio Format
Input: 16 kHz, 16-bit signed PCM, mono or stereo.
Output: 16 kHz, 16-bit signed PCM, mono.
Reference (AEC): 16 kHz, 16-bit signed PCM, mono
Note that mono or stereo input is defined when configuring a Speech Enhancement technology in VDK-Studio.
Getting Started
Before you begin, make sure you’ve completed all the necessary preparation steps.
There are two ways to prepare your project for Speech Enhancement:
-
Using sample code
-
Starting from scratch
From Sample Code
To download the sample code, you'll need Conan. All the necessary steps are outlined in the general Getting Started guide.
📦 speech-enhancement
conan search -r vivoka-customer speech-enhancement  # To get the latest version.
conan install -if speech-enhancement speech-enhancement/<version>@vivoka/customer -o asr_engine=csdk-asr -o speech_enhancement_engine=s2c
-
Open project.vdk in VDK-Studio
-
Export in the same directory assets from VDK-Studio (choose a template for speech enhancement and compile model).
conan install . -if build
conan build . -if build
./build/Release/speech-enhancement
From Scratch
Before proceeding, make sure you’ve completed the following steps:
1. Prepare your VDK Studio project
-
Create a new project in VDK Studio
-
Add the Speech Enhancement technology and add enhancer.
-
Export the project to generate the required assets and configuration
2. Set up your project
-
Install the necessary libraries
-
vsdk-s2c/2.2.3@vivoka/customer -
vsdk-audio-portaudio/4.3.1@vivoka/customer -
vsdk-samples-utils/1.1.0@vivoka/customer
-
These steps are fully explained in the Get Started guide.
Start Speech Enhancement
1. Build Pipeline
For this example, we’ll implement a simple pipeline that records audio from the microphone and sends it to recognizer:
Start by initializing the Voice Recognition engine:
You cannot create two instances of the same engine.
#include <vsdk/audio/Pipeline.hpp>
#include <vsdk/audio/producers/PaMicrophone.hpp>
#include <vsdk/audio/consumers/File.hpp>
#include <vsdk/speech-enhancement/s2c.hpp>
#include <vsdk/utils/samples/EventLoop.hpp>
#include <vsdk/utils/Misc.hpp> // for printExceptionStack
#include <fmt/core.h>

#include <csignal>
#include <memory>

using namespace Vsdk;
using namespace Vsdk::Audio;
using namespace Vsdk::SpeechEnhancement;
using Vsdk::Utils::Samples::EventLoop;

using S2cEngine = S2c::Engine;

namespace {
    constexpr auto enhancerName = "enhancer-1";
    constexpr int sampleRate    = 16000;
    constexpr int inputChannels = 1;
    constexpr char const * outputFile = "enhanced-output.raw";
}

int main() try
{
    std::shared_ptr<void> const guard(nullptr, [] (auto) { EventLoop::destroy(); });

    auto engine   = Engine::make<S2cEngine>("config/vsdk.json");
    auto enhancer = engine->speechEnhancer(enhancerName);

    auto mic = std::make_shared<Producer::PaMicrophone>();
    auto file = std::make_shared<Consumer::File>(outputFile, true); // true = overwrite

    Pipeline pipeline;
    pipeline.setProducer(mic);
    pipeline.pushBackModifier(enhancer);
    pipeline.pushBackConsumer(file);
    pipeline.start();

    EventLoop::instance().run();
    return EXIT_SUCCESS;
}
catch (std::exception const & e)
{
    fmt::print(stderr, "Fatal error:\n");
    Vsdk::printExceptionStack(e);
    return EXIT_FAILURE;
}
For linux users, you can play audio from a file using the following command:
aplay -f S16_LE -r 16000 -c 1 enhanced-output.raw
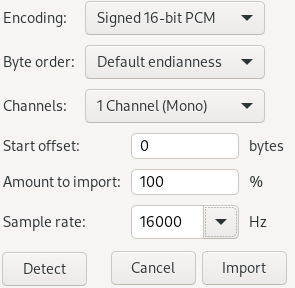
For windows users, you can use Audacity software and import the raw file (File->Import->Raw Data…) with the following settings:
2. Start/Stop Pipeline
pipeline.start();
pipeline.stop();
pipeline.run();
-
.start()runs the pipeline in a new thread -
.run()runs the pipeline and waits till it is finished (blocking) -
.stop()is used to terminate the pipeline execution
Once a pipeline has been stopped, you can restart it at any time by simply calling .start() again.
Acoustic Echo Cancellation (AEC)
Acoustic Echo Cancellation (AEC) is a technique used to eliminate the echo that can occur when a device plays audio (e.g., TTS output) and simultaneously captures audio through its microphone. Without AEC, the playback audio may be picked up by the microphone and misinterpreted as user input—especially problematic in interactive voice applications.
You can achieve this by providing the enhancer with a reference signal through a separate pipeline. In this setup, the enhancer acts as a consumer and fills its internal buffer with the supplied reference signal.
Pipeline referencePipeline;
referencePipeline.setProducer(...); // see "Reference" in audio format.
referencePipeline.pushBackConsumer(enhancer);

Pipeline enhancedPipeline;
enhancedPipeline.setProducer(...) // signal with unwanted echo
enhancedPipeline.pushBackModifier(enhancer);
enhancedPipeline.pushBackConsumer(...); // do something with the filtered audio.
Note that you can run both pipelines simultaneously or asynchronously. The reference signal is consumed in real time alongside the enhanced audio pipeline.
The reference signal must not be delayed relative to the input—it must always arrive before or in sync with it. If your pipelines are paused or resumed, or if more reference data is processed than input, you may need to clear the reference buffer to prevent misalignment.
For better results, you can adjust the offset delay up to 950ms in your VDK project. This defines the minimum period before the reference may appear in the input.