

Voice Biometry is a technology designed to authenticate or identify users. It can be used to grant access to a user, using its voice as a password, or identify someone between a certain population thanks to a unique voiceprint.
For additional information on the use of Voice Biometrics, you can also refer to the Voice Biometrics tutorial available on VDK Studio.
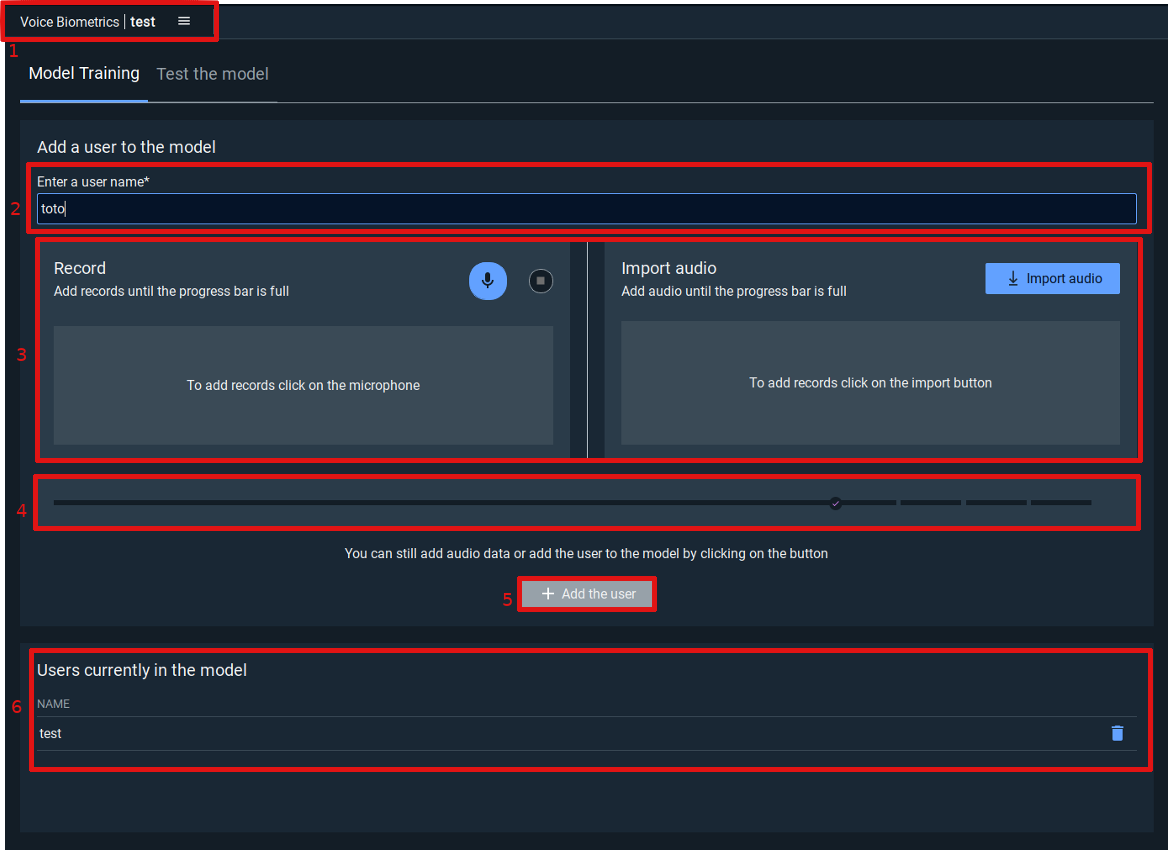
Main screen - Model Training tab
-
Tab name. It contains the widget name and the model name
-
User name. It is to enter the username of the user you want to enroll
-
Audio data. You can record audio or/and upload files. There is a minimum indicated by the progress bar.
-
By clicking on “Record”, you will be able to record audio with your microphone.
-
By clicking on “Import audio”, you will be able to import an audio file from your computer (Audio files must be 16bits 16Khz monochannel). Such a file can be created with the command arecord -c 1 -f S16_LE -r 16000 [filename].raw on Linux. You can also use a software like Audacity to do this on Windows or Linux.
-
Once you record or import an audio file, your entry will be added into the list.
-
-
Progress bar. It indicates if there is missing audio for the minimum requirement. When it is full it will animate to let you know that you still can add audio data, or press the add user button.
-
Add user button. Click it when available to add the user to the model. In case of error during the enrollment you can try to add more audio data, as the quality of the data given is analyzed during the enrollment. (If you give 13 seconds of empty audio the enrollment may fail).
-
Users currently in the model. Display all the users already enrolled inside this model.
For text dependent model you need at least 4 utterances and for text independent model at least 13 seconds of audio.
The more audio data you give for one user, the more precise the model will be.
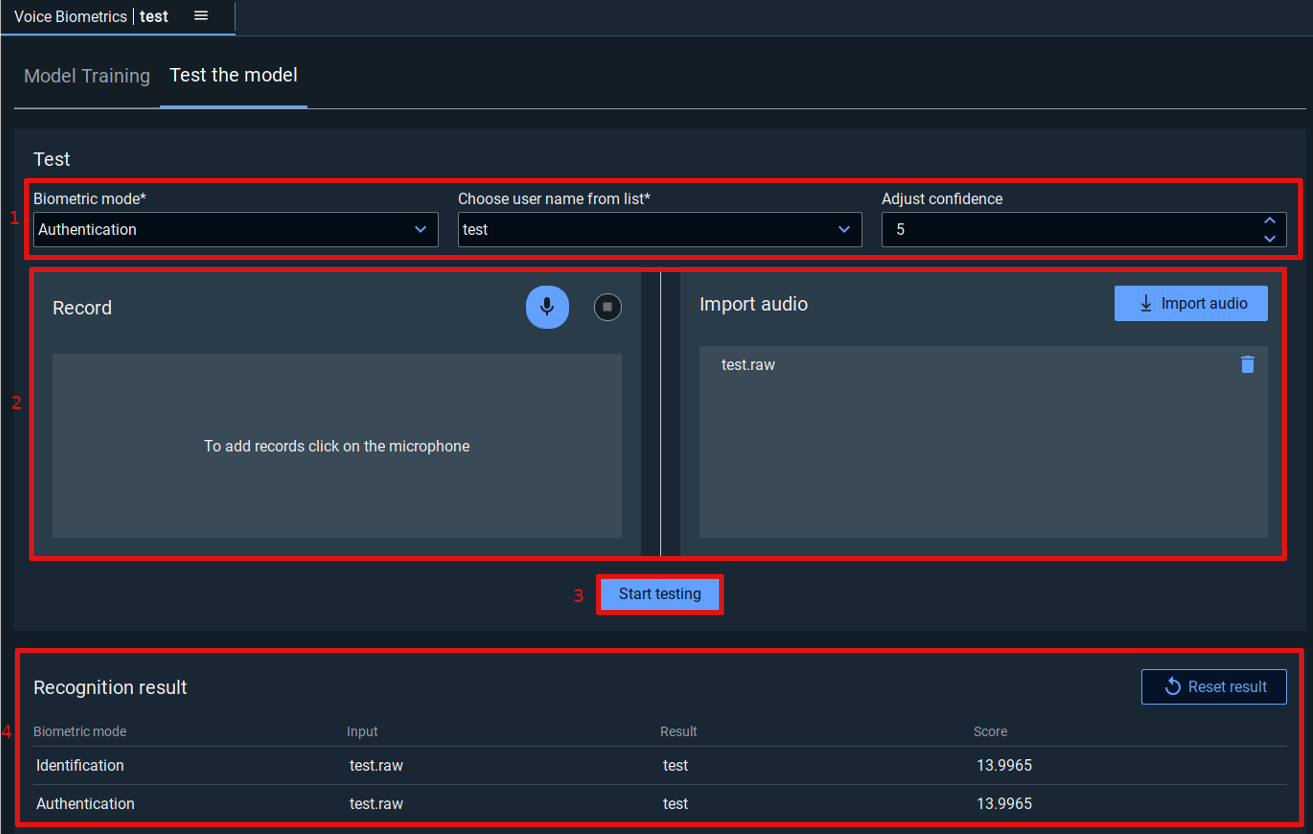
Main Screen - Test tab
-
Parameters.
-
Biometric mode: Choose your biometric mode between “Authentication” and “Identification”. “Authentication” is used to test a person’s voice against a single identity. “Identification” does not specify the vocal identity to be tested, but it is done among all those of the model.
-
Choose user name from list: If you chose “Authentication” you need to select the authentication ID in this field.
-
Confidence: Note that confidence is only important if you use Sensory as a provider. 10 is the strictest, meaning that you will have the lowest false positive but also the highest false negative and 0 is the laxest.
-
-
Audio data. You can record audio or/and upload files.
-
By clicking on Record, you will be able to record audio with your microphone.
-
By clicking on Import audio, you will be able to import an audio file from your computer (Audio files must be 16bits 16Khz monochannel). Such a file can be created with the command arecord -c 1 -f S16_LE -r 16000 [filename].raw on Linux. You can also use a software like Audacity to do this on Windows or Linux.
-
Once you record or import an audio file, your entry will be added into the list.
-
-
Start testing button. It will start the testing for each record and audio file listed.
-
Recognition result. The result of your test will be shown on this table. If the result column remains empty it means that the engine didn't recognize anything and didn't send an event, you can take it as a rejection of this data.The score depends of the provider : for Sensory you should have a positive score, if you get one that is wrong you must up your confidence level.For IDRND the score will be between 0 and 1 and you should try yourself to use your own threshold to reject people. 0.6 is a value that is usually satisfying.
Create a model
In the card click on "Add model".
A wizard with the configuration of the model will appear.
In this wizard you can specify :
-
A name (must be a unique identifier for the model)
-
The type (text dependent (a.k.a. TD) or independent (a.k.a. TI))
-
The provider of voice biometry
-
The path where the model will be created
Once the model created you can see the card added to the view, click on it and go to the next step !
Train the model
Be sure to have the widget voice biometrics opened, if not you can click on the model's card on the left.
You will need to enter a user name in order to be able to add audio data.
You can train the model with a record and with previously saved audio files.
Audio files must be 16bits 16Khz monochannel.
Such file can be created with the command arecord -c 1 -f S16_LE -r 16000 [filename].raw on Linux. You can also use a software like Audacity to do this on Windows or Linux.
For text dependent model you need at least 4 utterances and for text independent model at least 13 seconds of audio.
The more audio data you give for one user and the more precise the model will be.
Save the user
Click on Add the user. If the enrollment succeed you will see your user added in the list below, if there is an error you may need to add more audio data as the quality of this data is important.
When you succeed you can go to the next step !
Test your model
-
Go to the Test the model tab
-
Click on Record or Browse audio file to give audio data to test your model with
When you have enough data for your test you can click on Start testing to see the result.
The confidence is only important if you use Sensory as provider. 10 is the strictest, meaning that you will have the lowest false positive but also the highest false negative and 0 is the laxest.
If the result column remain empty it means that the engine didn't recognize anything and didn't send an event, you can take it as a rejection of this data.